How to add Halloween effects to your WordPress site using WPBakery
The spooky season is here! Halloween is the perfect time to bring some thrilling effects and creativity to your WordPress website. Whether you’re running a blog, portfolio, or eCommerce store, adding Halloween vibes makes your site more engaging and fun.
In this post, we’ll walk through how to create a Halloween-themed hero section using WPBakery, explore creative design ideas, and share GPT-powered custom element prompts you can use right away.
Get inspired with Halloween templates
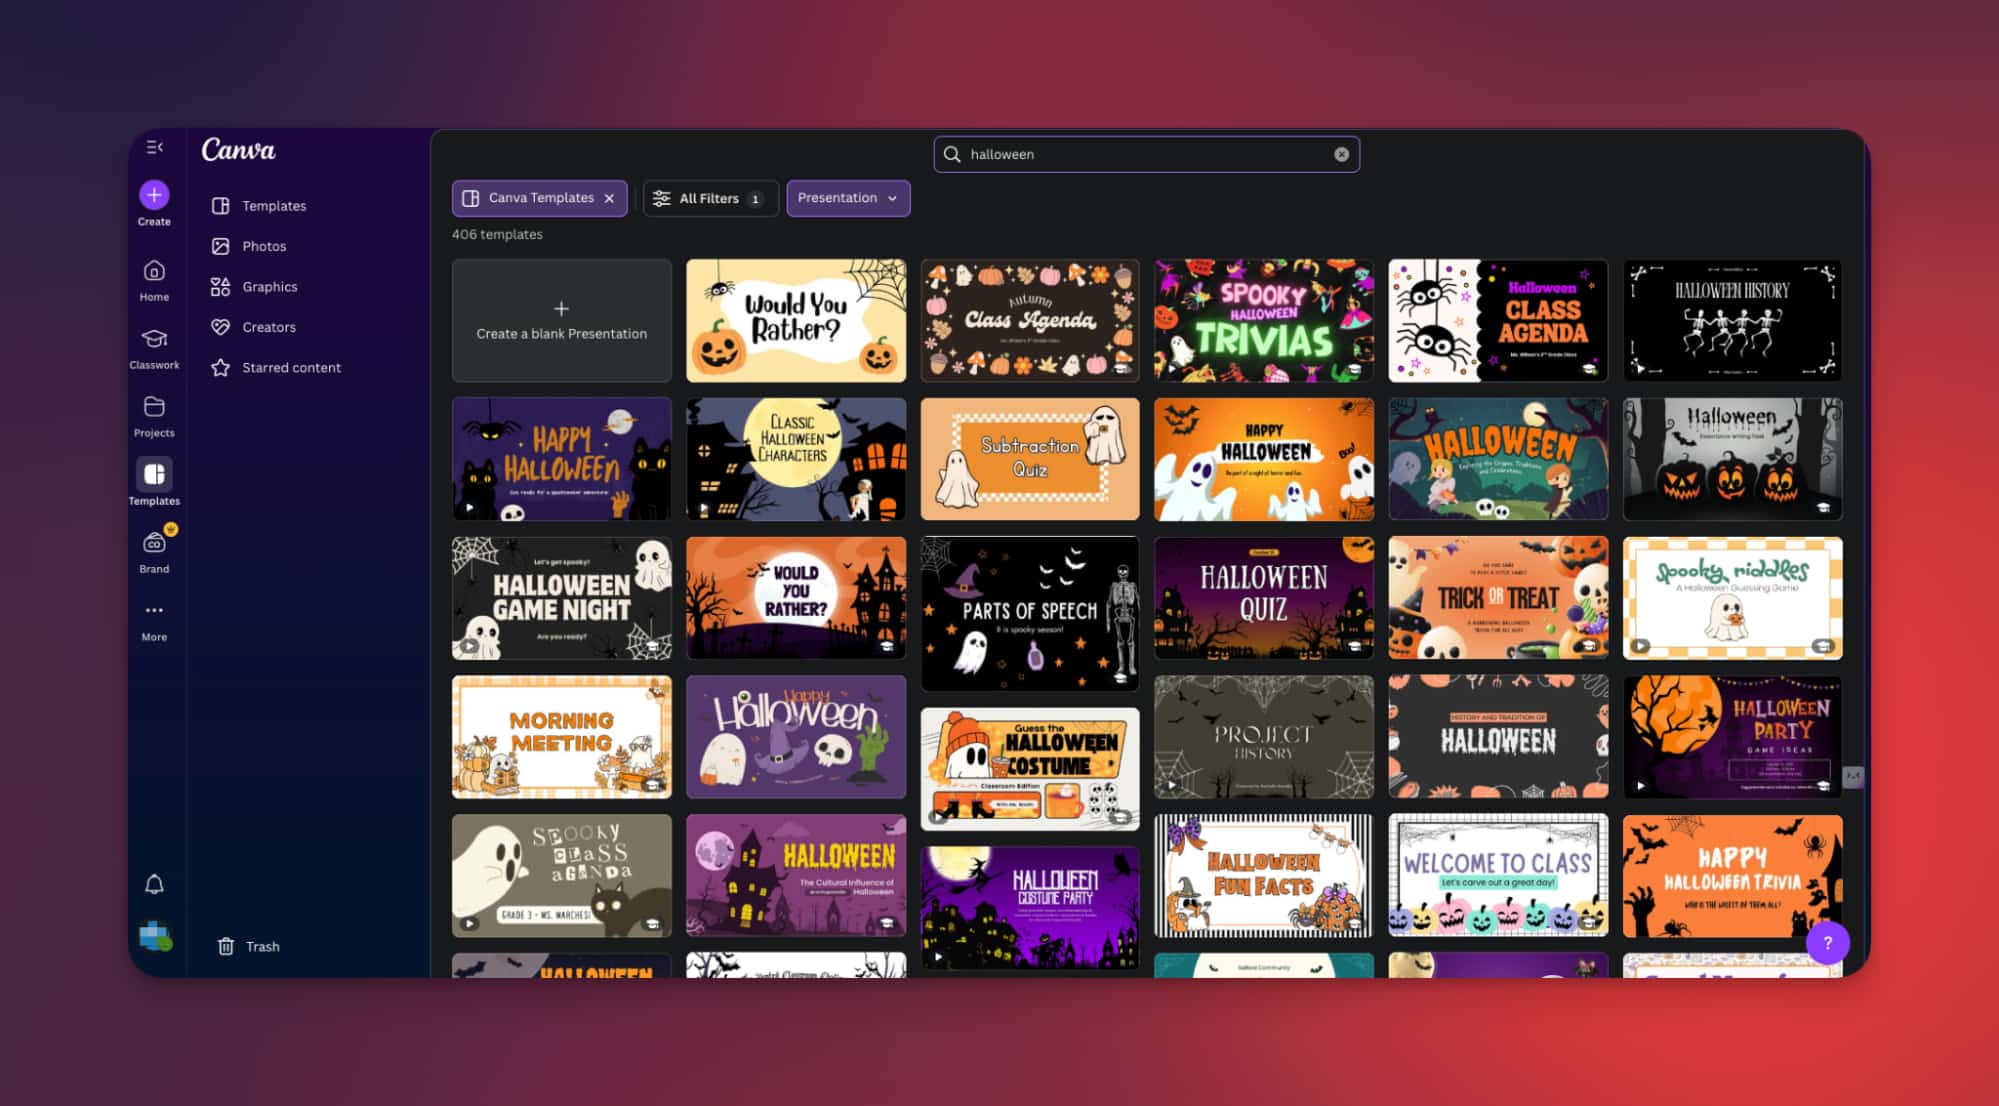
Before building your design, gather inspiration. You can browse Halloween templates on Canva, CodePen, or Unsplash for spooky images and color palettes. Look for visuals like ghosts, pumpkins, bats, and dark-themed backgrounds to set the mood. You’ll use some of these later in your WPBakery layout.
If you already have a Halloween design in mind, you can start from there instead. WPBakery lets you customize it completely from layout to colors and animation effects.
Create a Halloween hero section with WPBakery
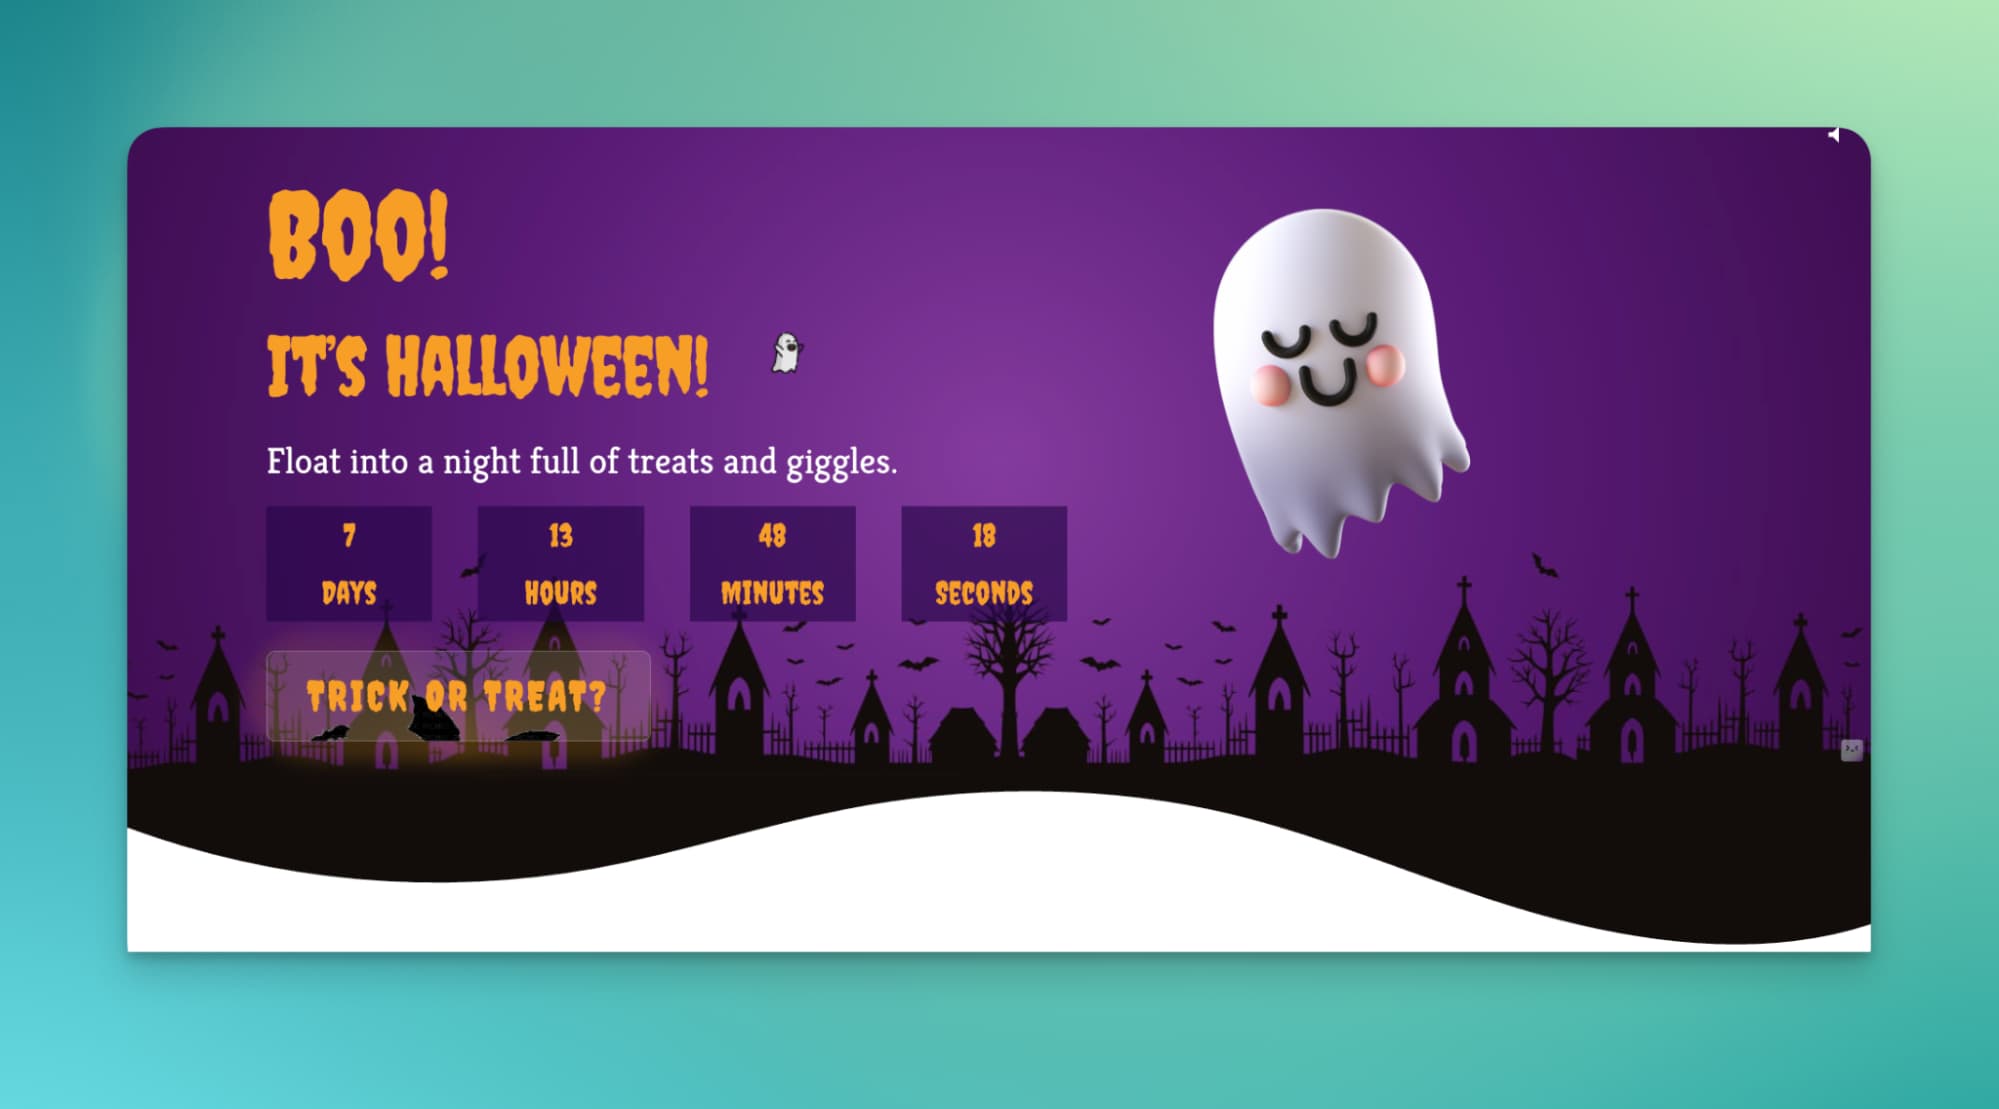
This is our demo design. We’ll now show how to prepare a Halloween-themed hero section like our demo version. It includes floating ghosts, spooky buttons, countdown timers, and background sound effects created in WPBakery.
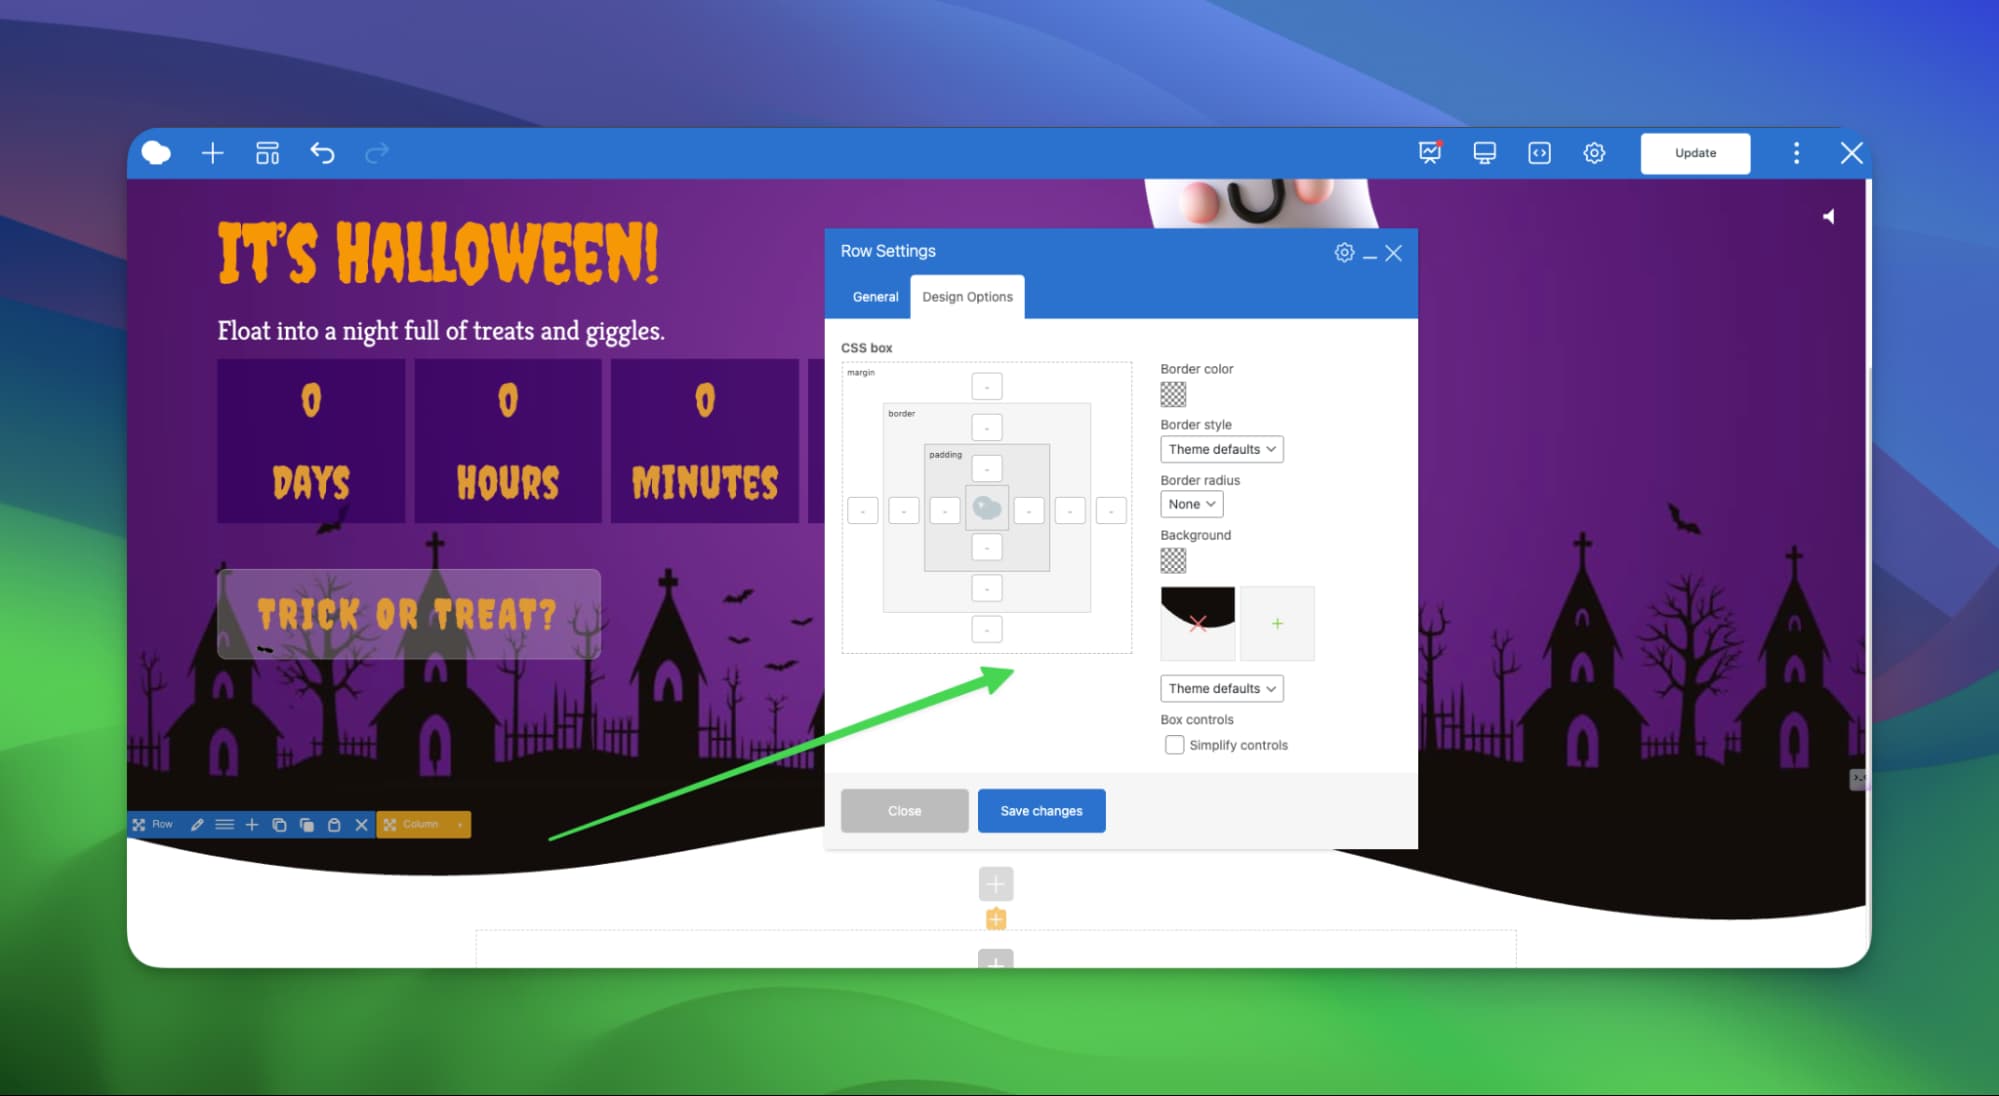
Step 1: Set up the section
- Open your WordPress dashboard and create a new page.
- Add a new row in WPBakery.
- In Row Settings, choose “Stretch row and content with no paddings.”
- Set your Halloween background image from the Design Options tab.
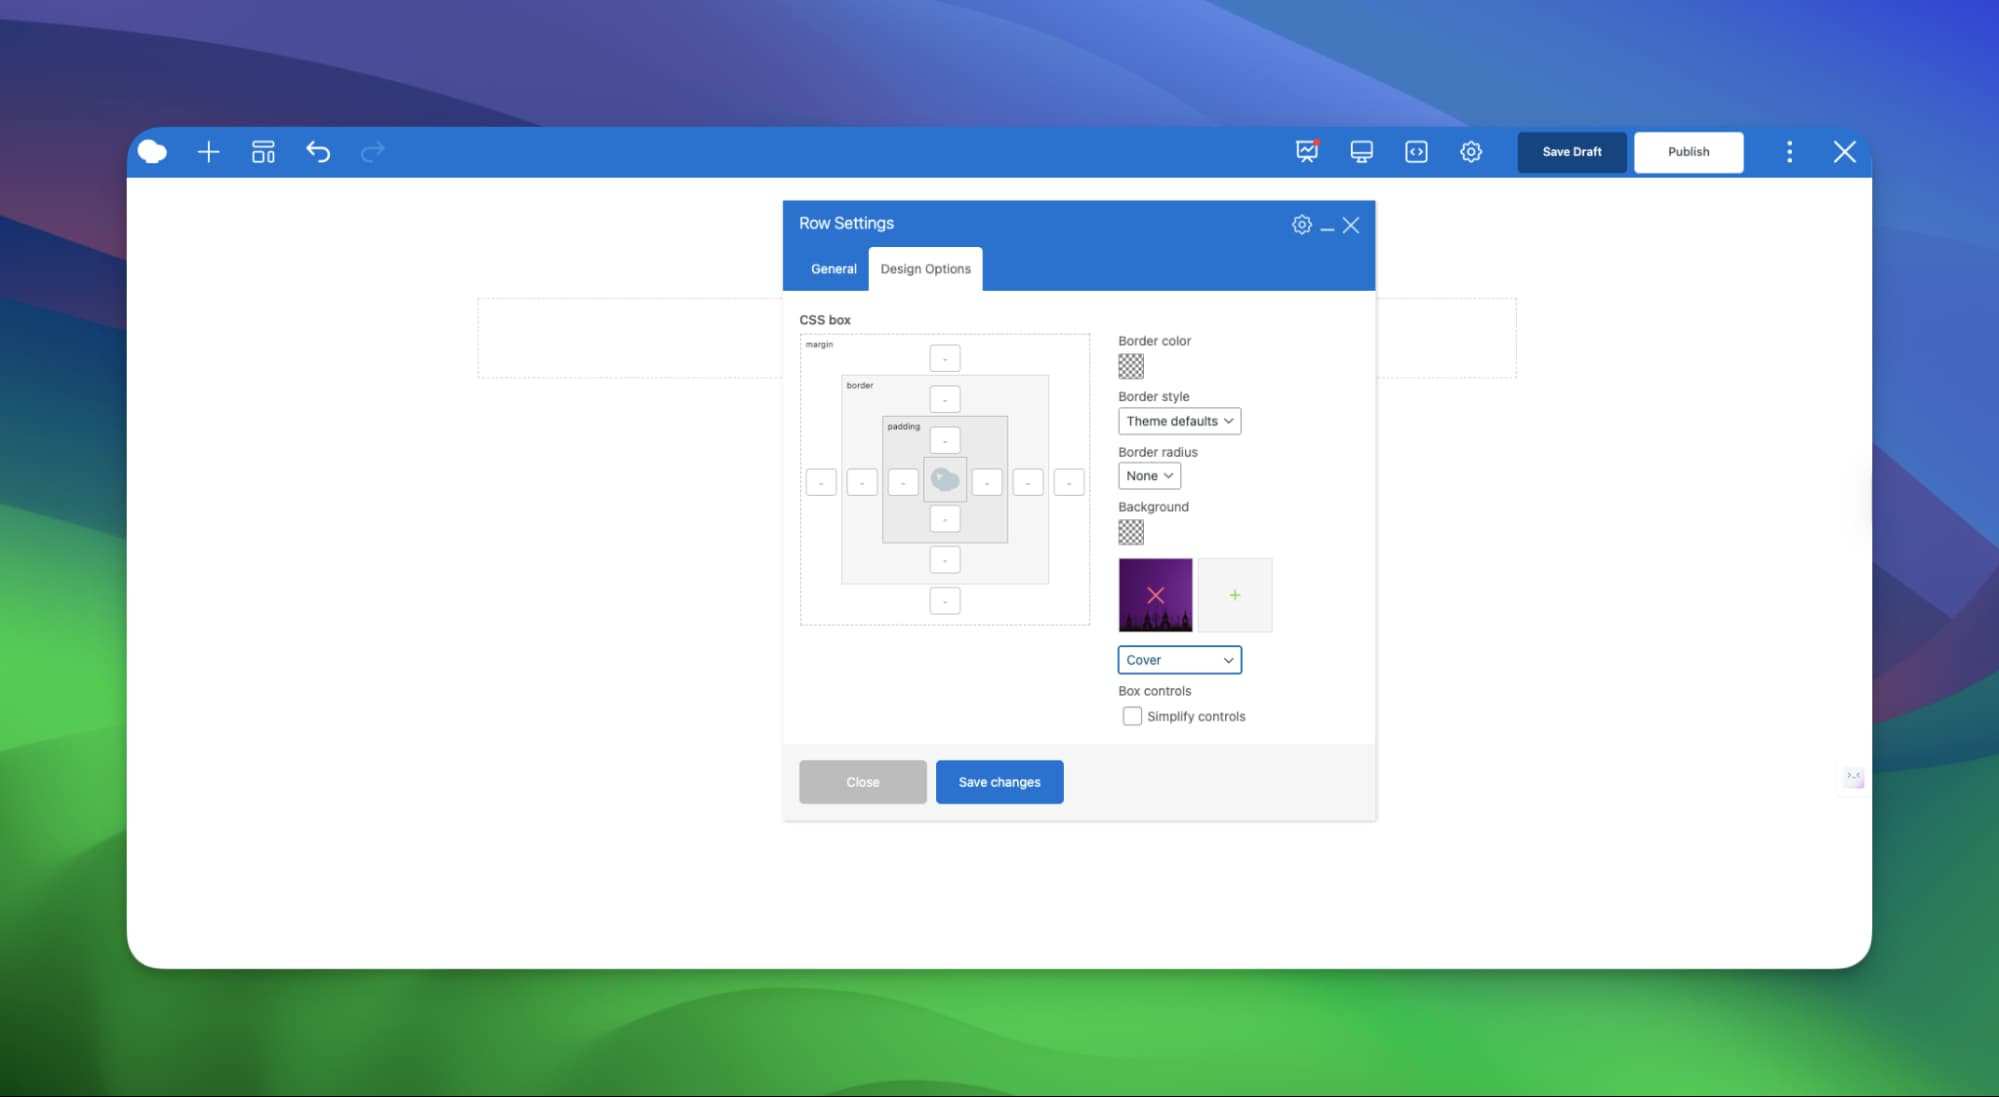
This background sets the spooky atmosphere for your entire hero section.
Step 2: Add the floating ghost image
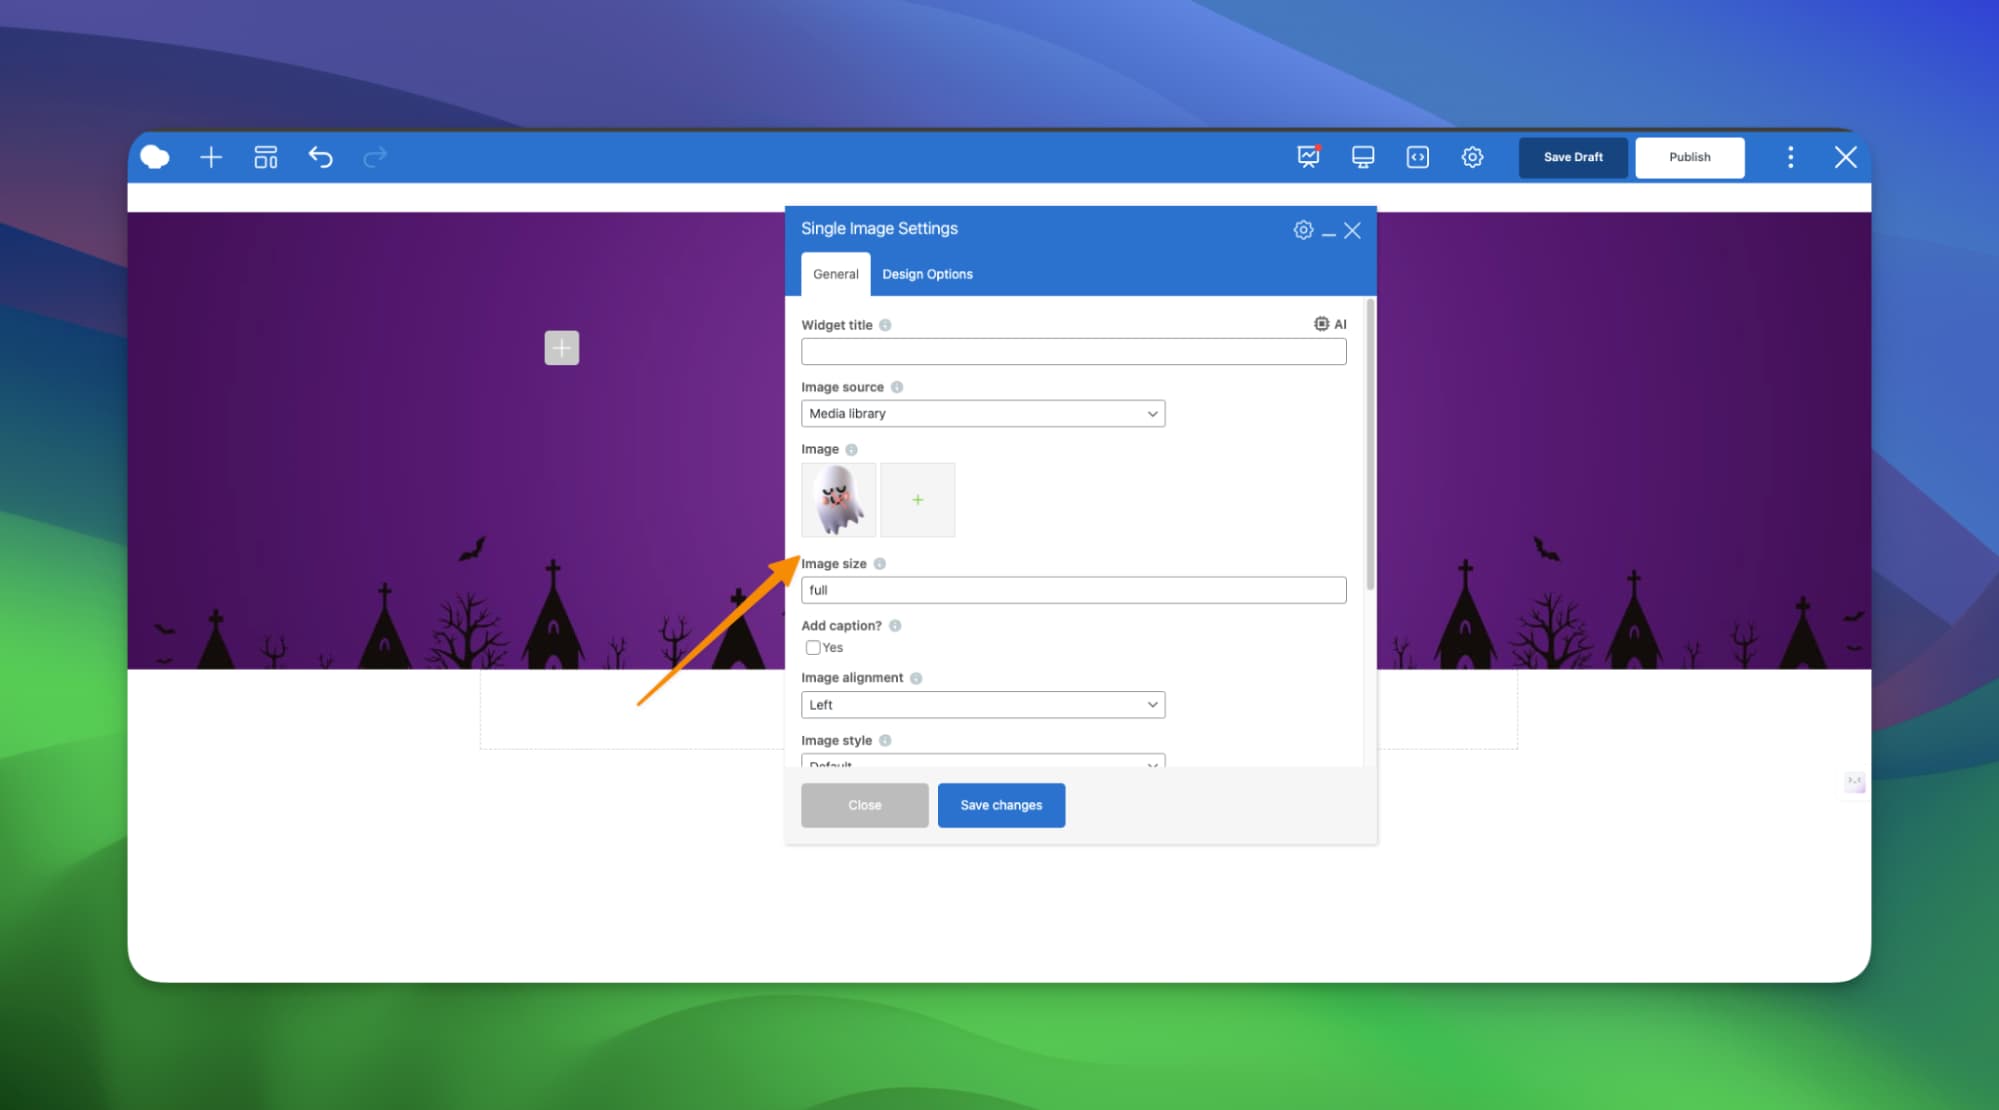
- Add an inner row with two columns.
- In the right column, insert the Single Image Element and upload your ghost (Casper) graphic.
- Set image size to Full.
- And save changes
Now add an animation effect to this spooky ghost image
To add a floating animation by assigning a custom class name “float-image” and paste the CSS from the prompts below into your Custom CSS panel. You can use the code below or generate it by using ChatGPT or our built-in WPBakery AI.
Here is the CSS Code –
.float-image {
  position: fixed;
  bottom: 20px;
  right: 20px;
  width: 100px;
  height: auto;
  z-index: 1000;
  animation: slideInUp 1s ease-out, bounce 2s 1s infinite ease-in-out;
}
@keyframes slideInUp {
  0% { transform: translateY(100vh); opacity: 0; }
  100% { transform: translateY(0); opacity: 1; }
}
@keyframes bounce {
  0%, 100% { transform: translateY(0); }
  50% { transform: translateY(-20px); }
}
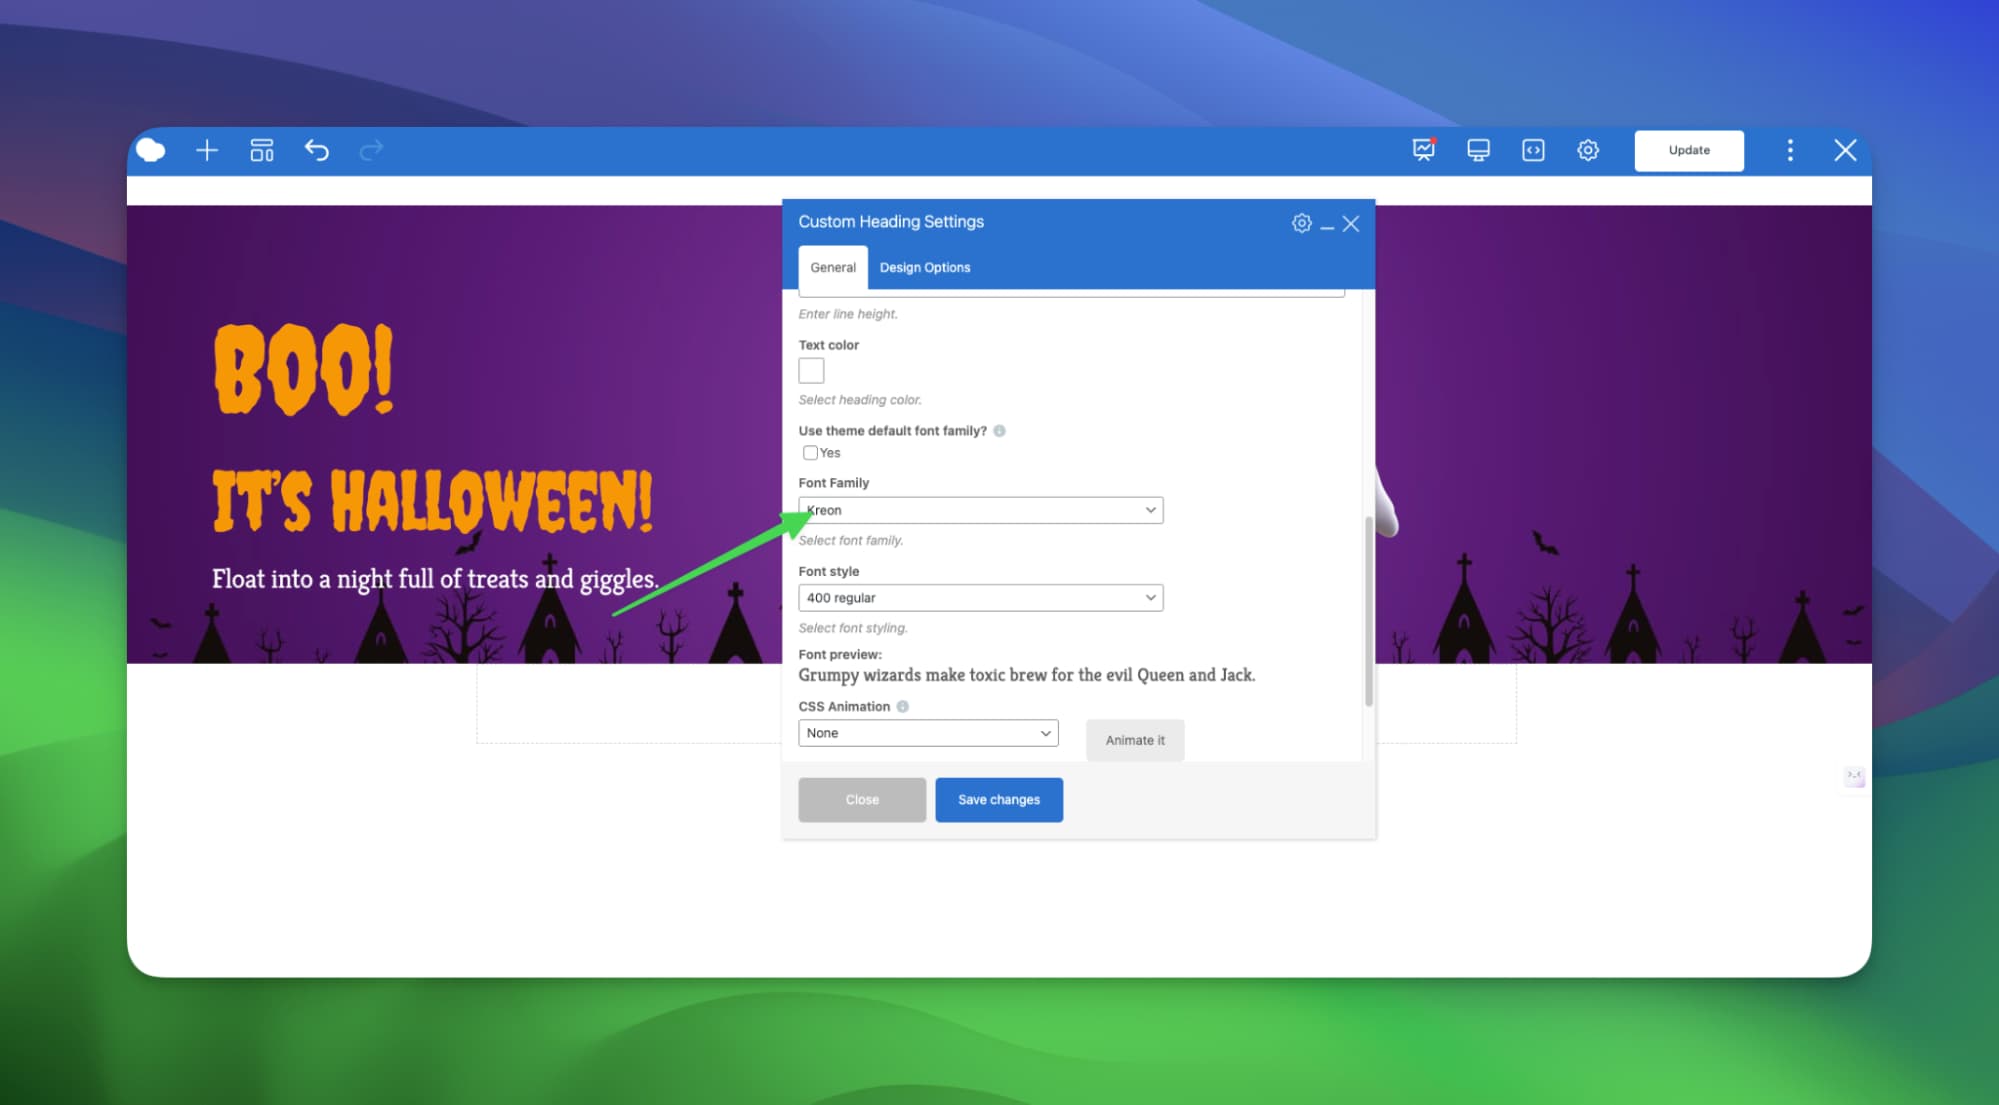
Step 3: Add headings and Halloween fonts
- Insert a Custom Heading element.
- Add your main headline text, for example:
- Boo! It’s Halloween! Float into a night full of treats and giggles.
- For a spooky effect, use the Google font Creepster for the main heading and Kreon for subheadings.
- Adjust color and font size to match your design.
Step 4: Add a Halloween countdown timer
Countdown timers make your page interactive and fun.
- Add a new WPBakery element for the countdown timer.
- Set the target date for your Halloween campaign.
- Customize text color, background transparency, and font style.
- Use Halloween fonts for a consistent design look.
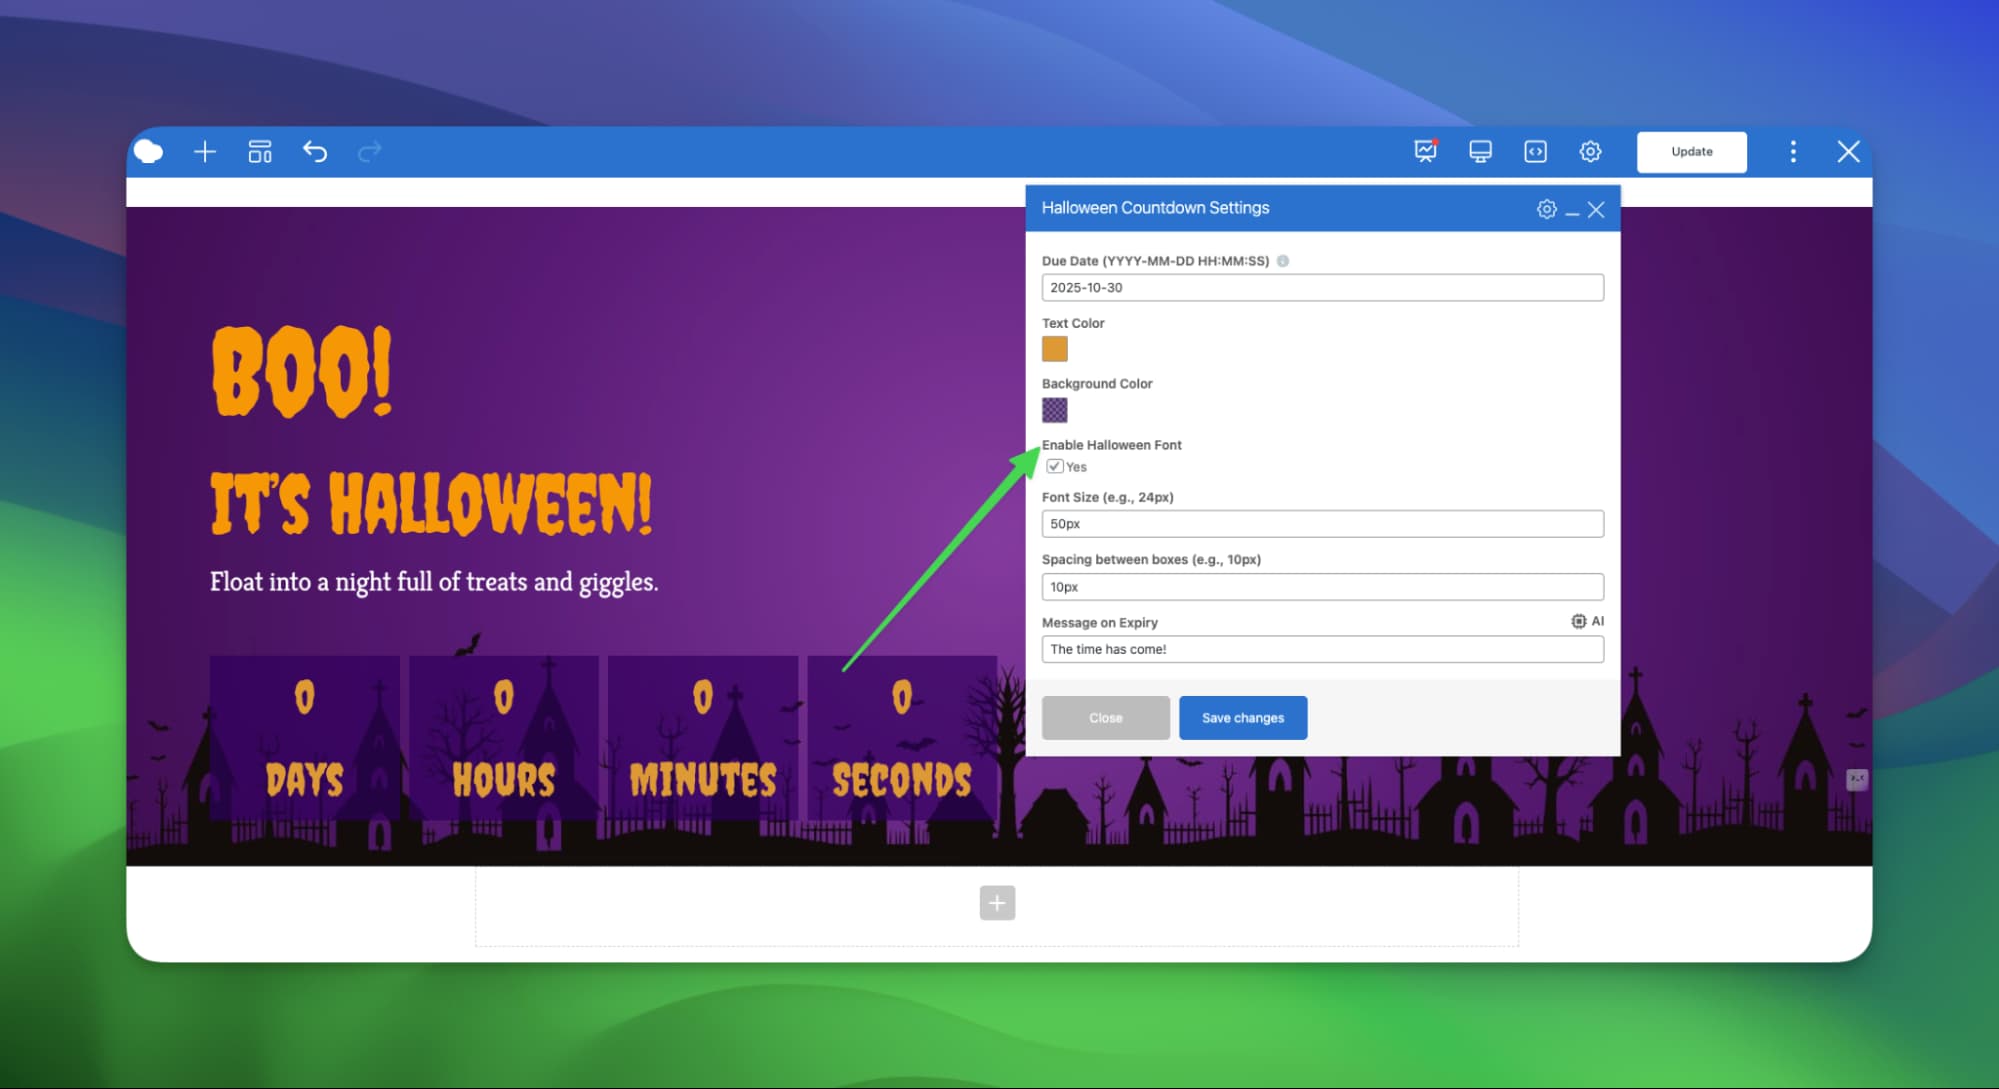
This countdown timer was created using our custom GPT. So you can build yours easily. You will get the detailed prompt in the prompt section along with the GPT Links.
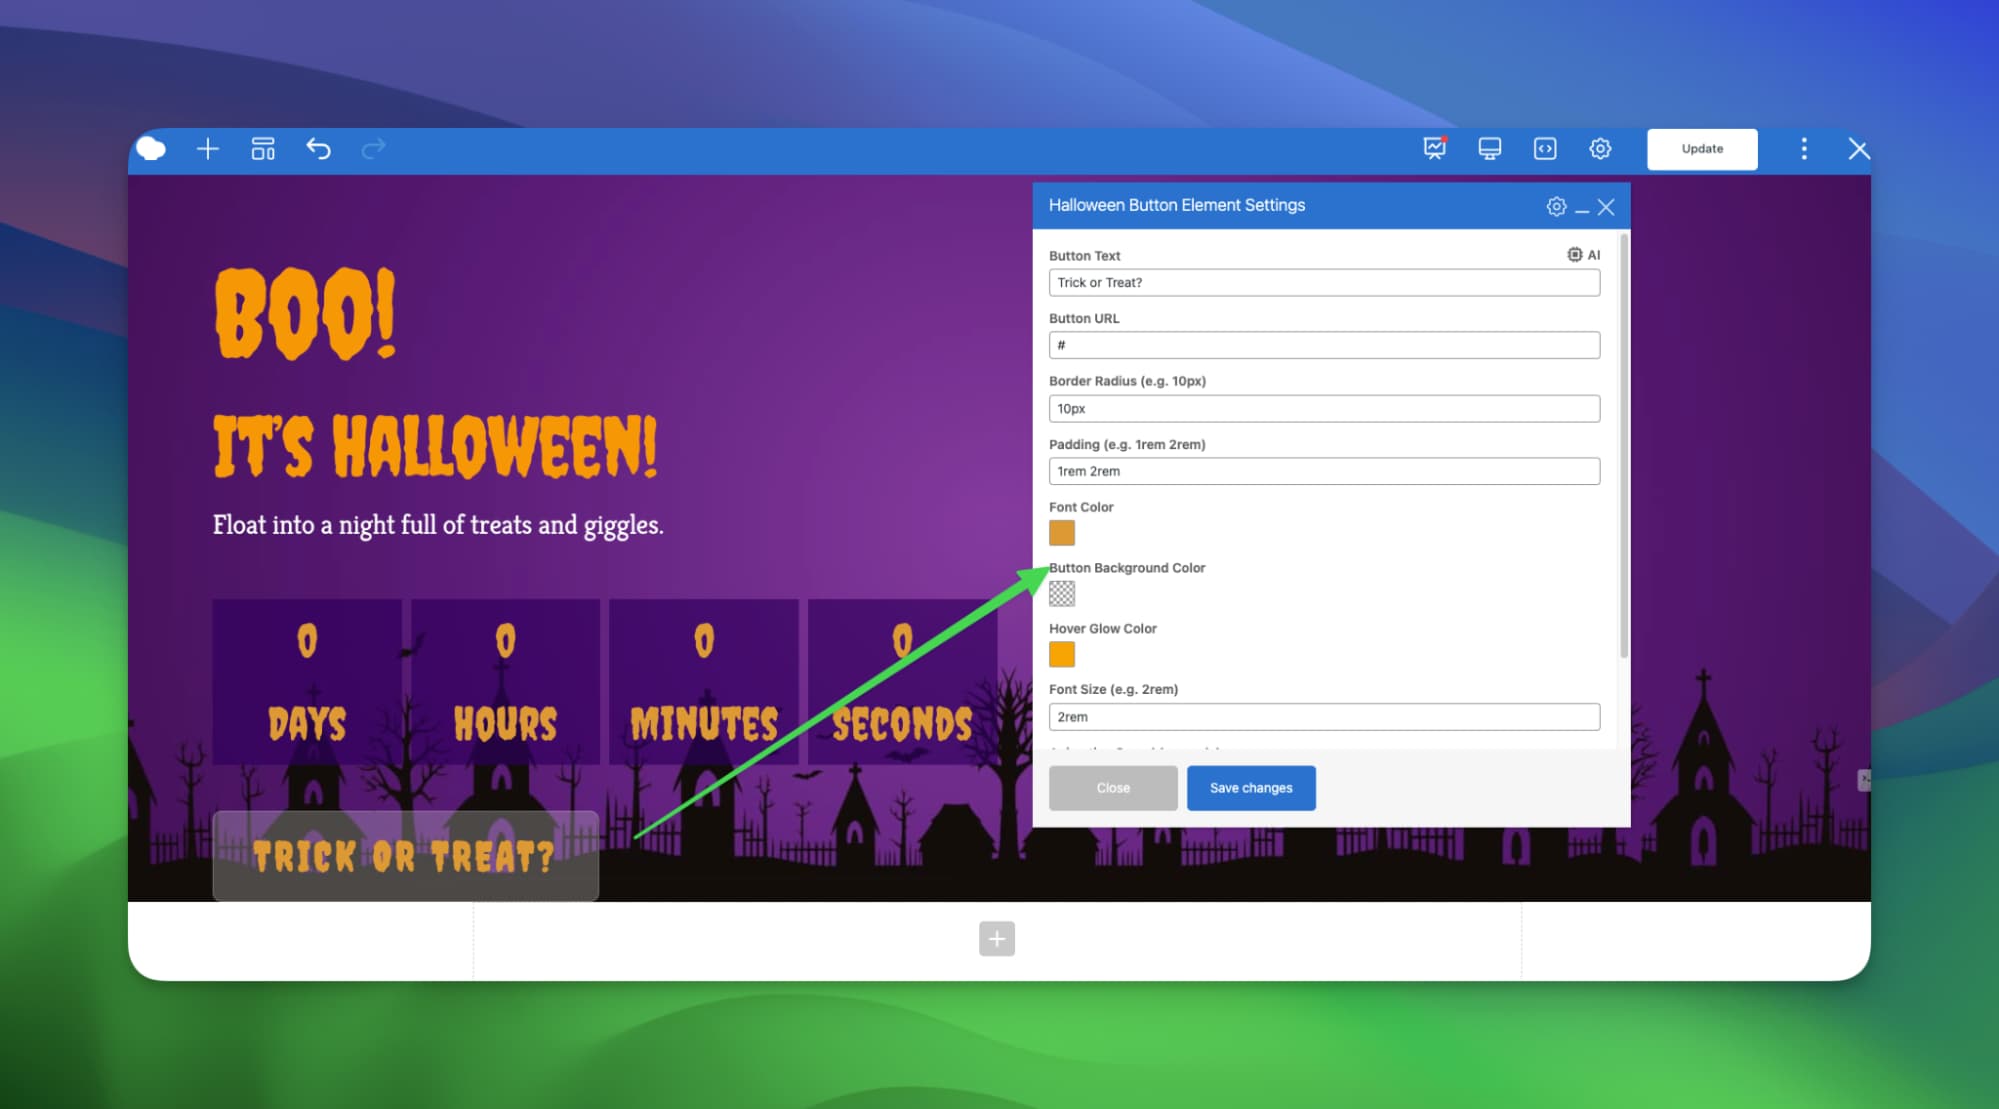
Step 5: Add the Halloween button and custom cursor effect
A creative button and cursor can make your page stand out.
- Add a Custom Button element (built via our GPT).
- Set button text, color, and link.
- Add margin or empty space above and below for better spacing.
It’s time for the custom cursor effect:
This effect will bring a special spooky effect to your Halloween design.
- Generate your spooky cursor image or get it from Flaticon (download the size exact or less than 32x32px).
- Add a custom class name to the cursor element and place the class name in any row or column’s Extra Class Name field.
- Hit save and see the changes in the frontend.
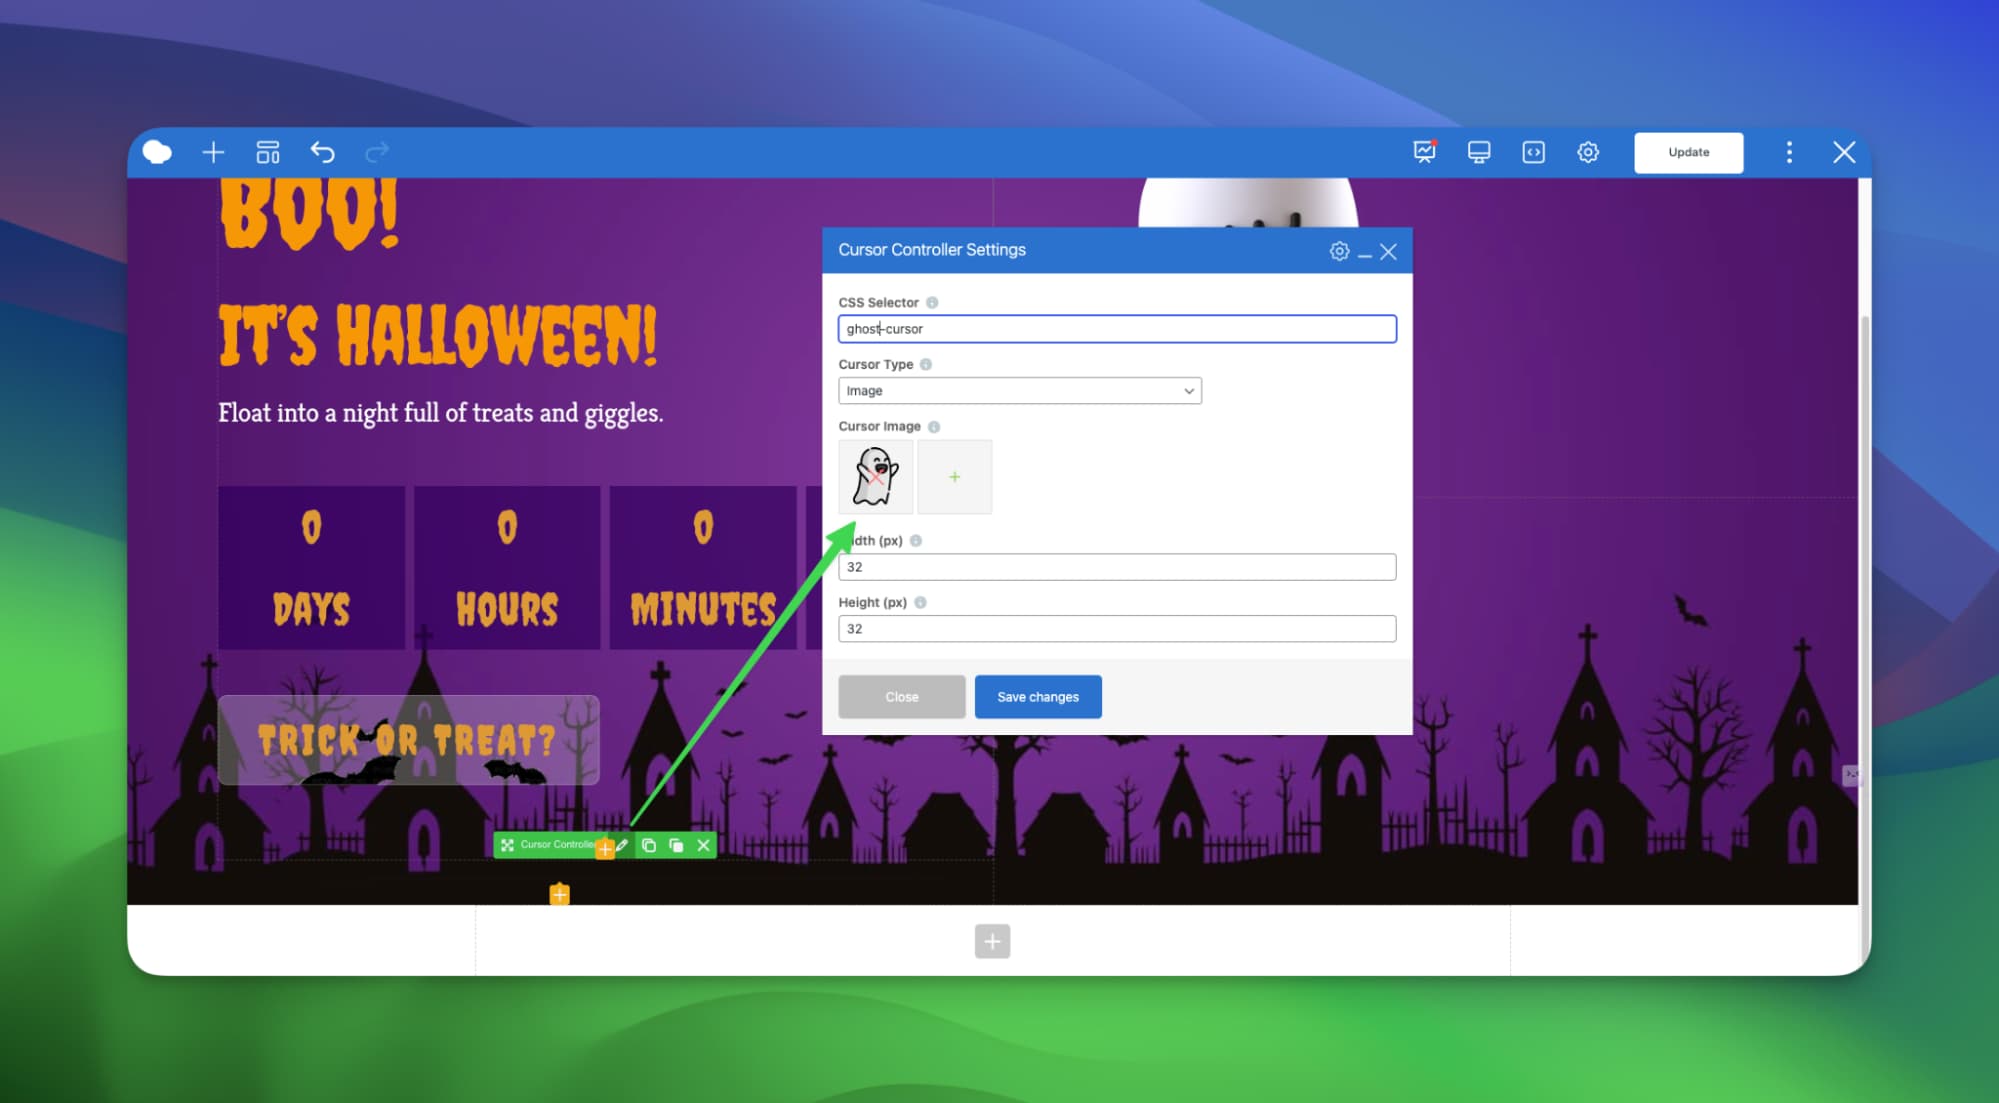
We built this custom element using our official GPT. You will get a detailed prompt to build the cursor effect element in the GPT Prompt section.
Step 6: Add background sound effects
You can bring your Halloween design to life by adding spooky sounds. Here you will get how you can add background sound effects to your Halloween sites using our custom-made Background Audio Player Element.
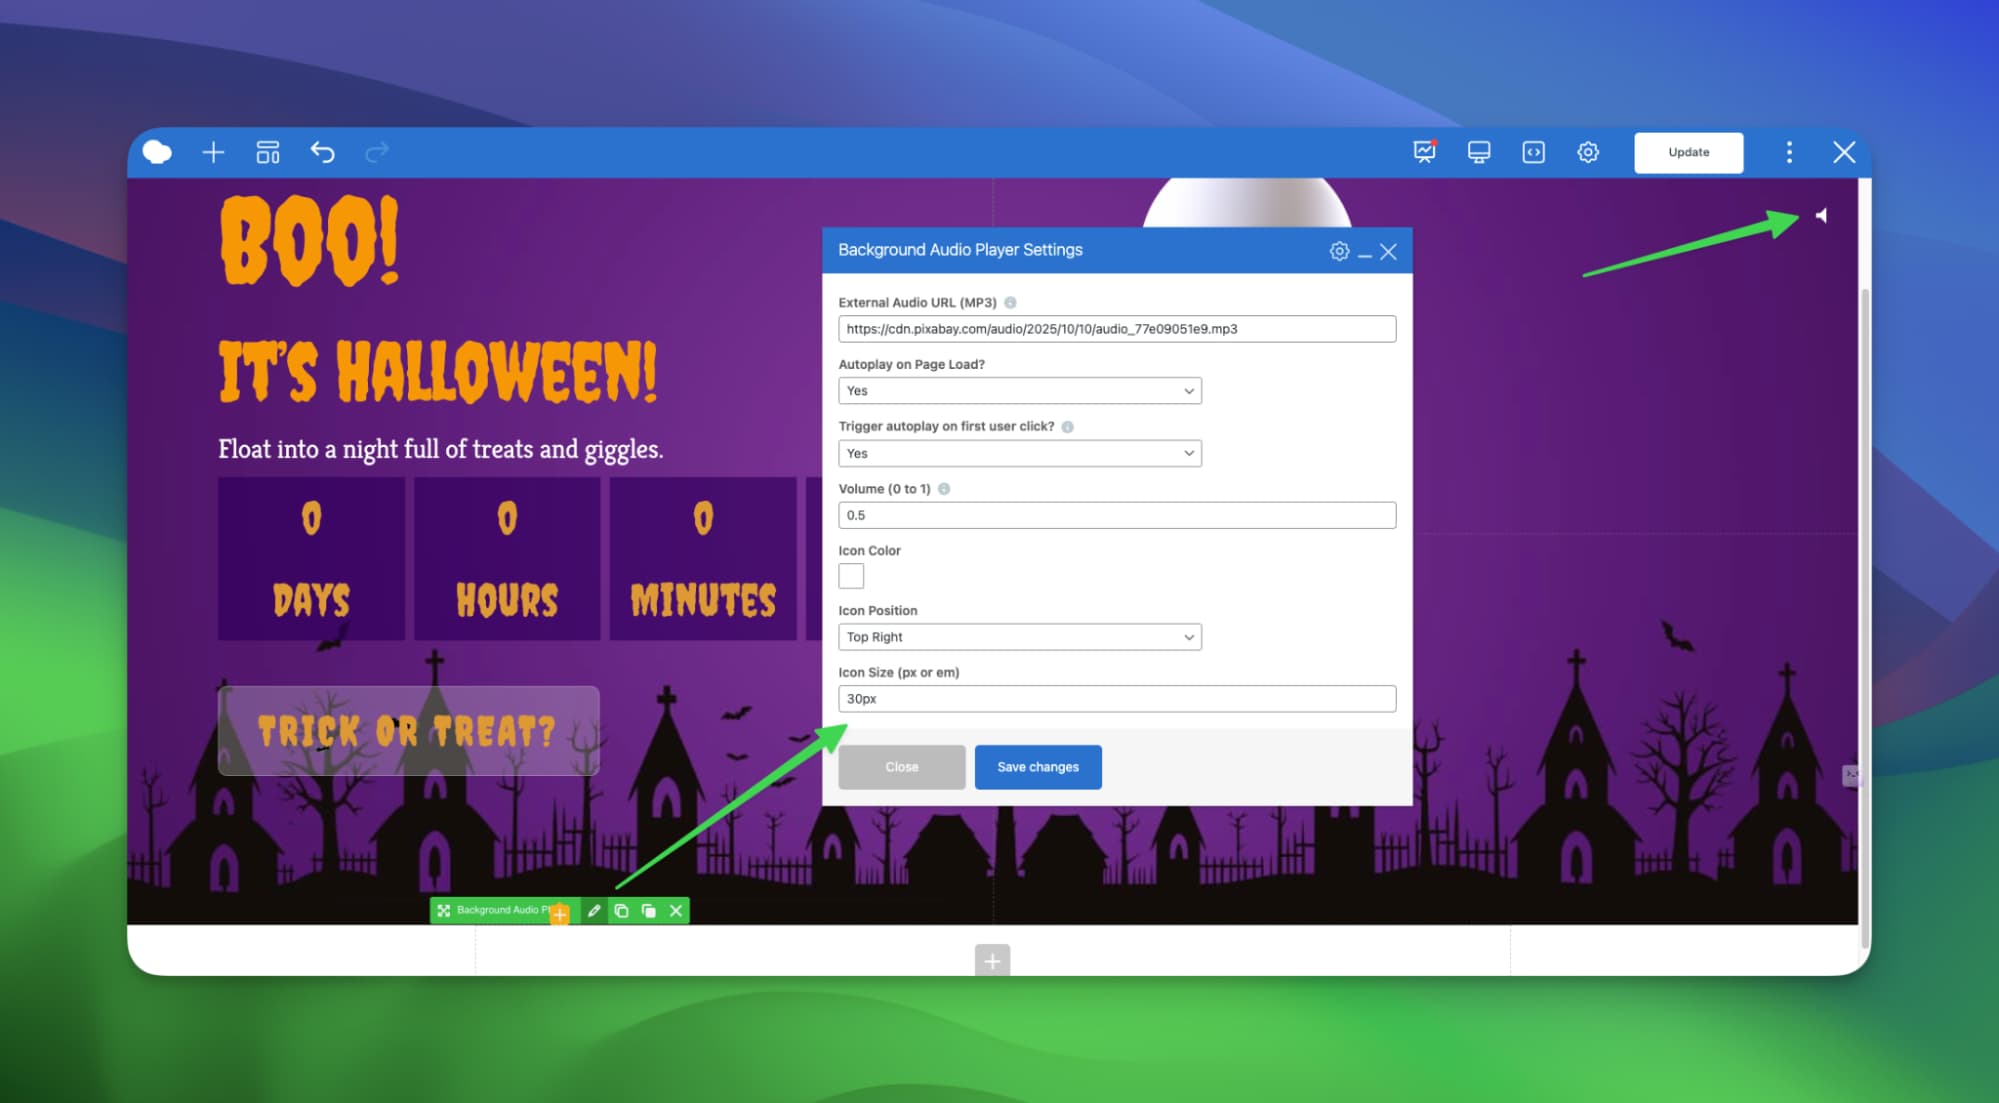
- Add the Audio Player element. This one was also created with our GPT.
- Select a Halloween sound from Pixabay.
- Copy the MP3 URL and paste it into the audio element.
- Enable autoplay on click and adjust volume.
- Style the play icon color and size. This icon will work as a frontend play button.
Step 7: Add a custom shape divider
Give your section a stylish finish with a shape divider.
- Visit shapedivider.app and create your SVG divider.
- Download the file and set it as a background image for your new row.
- Add an empty space element if needed for spacing.
Before uploading SVG files to your website, ensure that you have added the SVG MIME file type support. If not, you can easily enable it using the SVG Support plugin.
You get the idea of how you can create the spooky designs for your website.
Let’s build custom GPT elements
You can create your own WPBakery custom elements using our official GPTs.
Try:
- Create Element by Image GPT – Upload a screenshot of your section and follow the provided prompt.
- Generate WPBakery Custom Element from Description GPT – Describe the element you want, and GPT will generate the plugin for you.
Experiment, refine your prompts, and enjoy the creative process.
Prompts for creating the custom elements of WPBakery
Below are the GPT prompts mentioned above. Use them to generate your own custom elements and animations.
Countdown timer element GPT prompt
To generate the Halloween-themed countdown timer for WPBakery, you can use the Image-Based GPT.
Paste this Screenshot of our countdown timer to the GPT along with the prompt below.

Prompt:
I want to create a WPBakery countdown timer element for a plugin named Spooky Countdown Timer, with folder/plugin slug: spooky-countdown-timer.
The element should have the following features:
Core Functionality:
- A countdown timer displaying Days, Hours, Minutes, and Seconds.
- User can set a due date/time (YYYY-MM-DD HH:MM:SS) to count down from current time to that date.
- When the timer hits zero, it should display a custom expiry message.
WPBakery Editable Fields:
- Due Date (YYYY-MM-DD HH:MM:SS)
- Text Color (colorpicker)
- Background Color (colorpicker)
- Enable Halloween Font (Creepster from Google Fonts)
- Font Size (e.g. 32px)
- Box Spacing (e.g. 10px)
- Expiry Message
Design Behavior:
- Display timer in 4 blocks horizontally (Days, Hours, Minutes, Seconds)
- Responsive layout
- Optionally use Creepster font if enabled
Technical Requirements:
- Follow WordPress.org plugin standards:
- Add plugin headers
- Prefix all functions/classes with spooky_ to avoid naming collisions
- Wrap all PHP logic in if ( ! defined( ‘ABSPATH’ ) ) exit; for direct access protection
- Localize all strings using __() or _e() for i18n support
- Register shortcode and vc_map() safely
- Include necessary scripts inline or enqueue (keep it minimal)
Plugin Metadata:
- Name: Spooky Countdown Timer
- Slug/Folder: spooky-countdown-timer
- Description: A customizable, Halloween-themed countdown timer for WPBakery.
- Version: 1.0.0
- Author: WPBakery Element Builder
- License: GPLv2 or later
- Text Domain: spooky-countdown-timer
Halloween-themed button element creation prompt:
To generate the Halloween-themed button element for WPBakery, you can use the Text-Based GPT.
Prompt:
I want to create a custom WPBakery Page Builder element plugin for WordPress. Please generate a complete plugin with the following specs:
Element Purpose
A stylized Halloween-themed button that:
- Has spooky neon glow hover effects
- Displays a background animation (like bats)
- Includes no icons or audio
- Allows full styling control
Element Name
Frontend Name: Spooky Glow Button
Shortcode Base: vc_spooky_glow_button
Plugin Folder Name: spooky-glow-button-elementEditable Attributes (via WPBakery UI)
Please include the following as editable parameters:
- Button Text
- Button URL
- Font Color
- Background Color
- Hover Glow Color
- Font Size
- Padding
- Border Radius
- Glow Animation Speed
- Image Height (for future use)
Design Requirements
- Use CSS
conic-gradientandblur()to simulate a rotating neon glow on hover.- Button font:
'Creepster'from Bunny Fonts- Background image: animated bats (
https://raw.githubusercontent.com/cbolson/icodethis-challenges/main/assets/halloween/bats-2.gif)- Background clip effect with fallback
- No audio or SVG icons whatsoever
WordPress & WPBakery Requirements
- Follow WordPress best practices:
- Check if
vc_mapexists before registering- Sanitize and escape all dynamic output properly
- Enqueue styles and scripts using
wp_enqueue_*functions- Prefix all functions to avoid naming conflicts
- Ensure plugin fails gracefully if WPBakery is inactive
Deliverables
Please return:
- A downloadable ZIP of the plugin, ready to upload to WordPress
- Plugin file structure:
spooky-glow-button-element.php/css/spooky-glow-button.css/js/spooky-glow-button.js(optional minimal interactivity)- The plugin must be submission-ready for the WordPress Plugin Directory (wp.org), so follow coding standards and license compatibility
- Author Name: WPBakery Element Builder
Please build the full working plugin ZIP, including assets, using everything above without requiring further clarification.
Custom mouse cursor element creation prompt:
To generate the Custom Mouse Cursor element for WPBakery, you can use the Text-Based GPT.
Prompt:
I want to create a WordPress plugin that adds a WPBakery Page Builder element called:
Advanced Cursor Controller
It should allow users to apply custom cursors (CSS style, image, or icon class) to any target element using a CSS selector.
Requirements:
Editable WPBakery Fields:
- CSS Selector: where the cursor should apply (e.g., .my-class, #my-id)
- Cursor Type: CSS, Image, or Icon Class
- CSS Cursor: text input (e.g., grab, pointer)
- Image Upload: accepts .png, .cur formats
- Icon Class Input: e.g., fa fa-mouse-pointer or dashicons-admin-site
- Width & Height: for image/icon (defaults to 32px if empty)
Smart Features:
- Automatically adds dot (.) or hash (#) prefix to selector if user forgets
- Defaults to css cursor type if left empty (to avoid fatal logic)
- Image cursors include x y hotspot offsets for better support
- Enqueues assets only on frontend, safely
- Adds cursor config via data-config in a hidden div
- JavaScript reads and applies cursor on matched elements
- Fully compatible with backend editor (WPBakery)
WordPress Best Practices:
- Properly escapes and sanitizes data-config output (htmlspecialchars)
- Uses function_exists check before vc_map()
- Registers shortcode using add_shortcode()
- Loads JS/CSS via wp_enqueue_scripts, no anonymous functions
- Works safely even if WPBakery is not installed (no fatals)
Folder & Plugin Info:
- Plugin Folder: advanced-cursor-controller
- Plugin Slug: advanced-cursor-controller.php
- Plugin Name: Advanced Cursor Controller for WPBakery
- Version: 1.0
- Author: WPBakery Element Builder
- Ready for submission to WordPress.org repository (GPLv2+, i18n ready)
Output:
Please generate:
- A ready-to-zip plugin with:
- advanced-cursor-controller.php (main plugin file)
- cursor-style.css
- cursor-global.js
- All code properly structured and tested
- Tooltip descriptions for each VC field
- Uses vc_map() group = “Cursor Settings” or similar
Do not use dummy code or placeholders — it should be functional and bug-free.
Background audio player element creation prompt:
To generate the Background Audio Player element for WPBakery, you can use the Text-Based GPT.
Prompt:
I want to create a custom WPBakery Page Builder element that acts as a background audio player for WordPress with the following features:
Functional Requirements:
- Plays an MP3 audio file in the background.
- Frontend only shows a small mute/unmute toggle icon.
- Audio loops indefinitely.
User Controls (in WPBakery editor):
- Audio source via external MP3 URL.
- Volume level (0 to 1).
- Icon color.
Icon position (top-left, top-right, bottom-left, bottom-right).- Icon size.
- Autoplay on page load: Yes/No.
- Trigger autoplay on first user click: Yes/No
(note: include a note that browsers block autoplay with sound unless there’s user interaction)Frontend Behavior:
- Clicking the icon toggles mute/unmute.
- If autoplay = yes and click trigger = yes, audio plays on first page click.
- Volume is remembered using localStorage.
- The icon uses custom SVGs for mute and unmute states.
Technical Notes:
- Do not use emojis or text-based icons.
- Use best WordPress coding practices.
- Avoid fatal errors, ensure safe shortcode rendering.
- Use inline <style> and <script> safely with ob_start() output.
- Avoid third-party JavaScript dependencies.
- Generate a ready-to-install plugin folder and file (with proper plugin header).
Output Format:
- Name the plugin: Smart Background Audio Toggle
- Folder/plugin slug: smart-background-audio
- Version: 1.0
- Author: WPBakery Element Builder
- Ready for submission to WordPress.org repository (GPLv2+, i18n ready)
Return a full PHP plugin file I can install or submit to WordPress.org.
Caution on GPT prompts
Prompts may not work perfectly on the first try. You may need to tweak options and try again. Adjust the prompt, styles, and settings. Test on the frontend. Repeat until you get the result you want.
Watch the detailed tutorial video
If you want to watch the detailed video, we have also prepared a video to make it easier to follow this tutorial along. The video gives you a full overview of how to create a Halloween-themed hero section for your WordPress website using WPBakery.
FAQ
How do I add Halloween effects to my WordPress website?
You can add Halloween effects using WPBakery elements and our official GPT-powered custom tools built by yourself. Start with a themed background, spooky fonts, and Halloween graphics. Then, enhance the design with animations, countdown timers, buttons, and sound effects created in WPBakery.
Can I create custom animations in WPBakery?
Yes. You can create custom animations in WPBakery using the default animations or custom CSS. For example, you can add a floating ghost animation or other visual effects by assigning a class name and adding animation CSS in the Custom CSS panel.
How can AI tools help design festive layouts faster?
AI tools like GPT make it easier to create unique elements without coding. You can generate custom WPBakery elements, buttons, countdowns, and animations by describing what you need. This speeds up the design process and lets you focus on creativity.
Wrap up
Halloween gives you a fun reason to experiment with your website design. Using WPBakery and custom GPT tools, you can easily transform your pages with spooky visuals, sounds, and animations. Try these ideas, test your creativity, and share your Halloween designs with the community.
Happy haunting and happy building!