8 Vibrant Animated Background Effects for WordPress Sites
Do you want to make your website more engaging? Have you seen the animated background on a professional website and want to repeat it but lack coding experience?
In this article, we’ll show you how to easily add 9 simple yet effective animated background effects using only HTML, CSS, JavaScript, and WPBakery Page Builder. These effects, inspired by designs from WPBakery’s Showcase, include parallax scrolls, gradient transitions, and much more.
Let’s get started and transform your WordPress website with these dynamic background animations:
- Video Background
- Vertical Scroll Parallax
- Scrolling Background Color Changes
- Animated Gradient Background
- Moving Clouds Background Animation
- Animated Background Particles
- Floating Background Particles
- Falling Snow Particles
Video Background
Imagine having a stunning video playing in the background of your website’s hero section, just like the Lichtspiel Media website does.

Video backgrounds are by far one of the most popular effects for websites on our showcase, and deservedly so. They allow you to convey more information than any amount of text ever could and best of all – you can add them to your WordPress site using WPBakery Page Builder’s built-in options.
To add a video background to a row:
- Open the edit window for the row
- Scroll down to the Video Background section and check the box
- Insert the YouTube link
Click Save Changes (or enable auto-save, available from version 7.6.) and check out the result:

Note: To comply with copyright laws, only use your videos or videos explicitly stating they are free to use for any purpose, including commercial use, such as those available on platforms like Pexels offering royalty-free stock videos.
Vertical Scroll Parallax
Next up, we have the Millfield Homestead website, which uses a cool effect called vertical scroll parallax for multiple sections in a row.
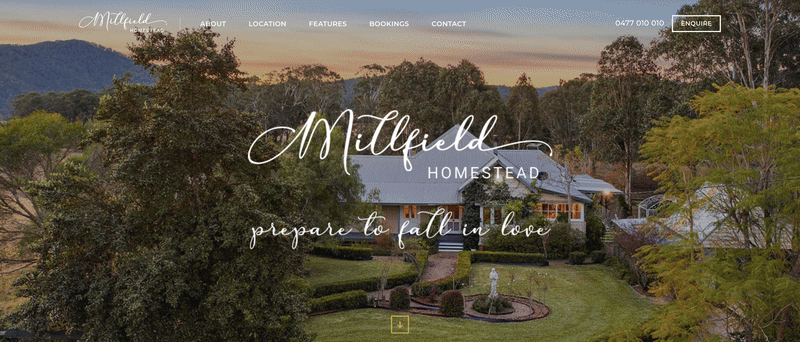
A scrolling parallax is a type of parallax effect, where the backgrounds appear to stay still while the content shifts vertically or horizontally on scroll. It makes your website more interesting and interactive.
You can achieve this effect by applying custom CSS code in WPBakery.
To add custom CSS to a page:
- Open the edit window for the row
- Scroll down to the Extra class name section
- Give the row an extra class name – “parallax” in our case
- Click Save Changes
- Go to the Page Setting by clicking on the gear icon on the top right
- Scroll down to the Custom CSS section
- Add the custom CSS code snippet:
.parallax {
background-attachment: fixed;
background-position: center;
background-repeat: no-repeat;
background-size: cover;
}
Click Save Changes and your effect will be applied:

But, in cases where you want to add a more subtle parallax effect, you can do so easily using WPBakery’s built-in options.
To add a parallax effect to a row:
- Open the edit window for the row
- Scroll down to the Parallax section
- Select the parallax type from the dropdown
- Insert an image from the media library
- Adjust the parallax speed
Save changes and preview the parallax effect:

Scrolling Background Color Changes
Take inspiration from Stadsmuseum Harderwijk’s website, where the background color changes as you scroll down each section. This subtle effect brings the whole site to life without overwhelming the visitor.

To add a scrolling background color change effect to your website using WPBakery, follow these steps:
- Go to the Page Setting by clicking on the gear icon on the top right
- Scroll down to the Custom CSS section
- Add the custom CSS code snippet:
- Scroll down to the Custom JavaScript section
- Add the custom script:
body {
transition: background-color 1s ease;
}
jQuery(document).ready(function($) {
 $(window).scroll(function() {
   var $window = $(window),
       $body = $('body'),
       scroll = $window.scrollTop() + ($window.height() / 3),
       maxScroll = $(document).height() - $window.height(),
        scrollFraction = scroll / maxScroll;

   // Define color stops
   var colors = ['#FF8B00', '#6AC2B9', '#44244D', '#1F4F5D', '#FF8B00'];

   var hue = Math.floor(scrollFraction * (colors.length - 1));

   var color = colors[hue];
   $body.css('background-color', color);
 }).scroll();
});
Click Save Changes and check out the result:

With this code, the entire background color of the page will smoothly transition as you scroll down the page. You can also adjust the color stop values (RGB color codes) in the Javascript code, and add as many or as little colors as you want.
Note: Always make sure the text color is readable on all background colors you use, using a color contrast checker.
Animated Gradient Background
Next up, the BeeWebdesign website beautifully incorporates gradient overlays over images, enhancing its overall look and feel.

Gradients are also a top design trend of 2024, replacing boring, monochromatic color palettes. To take it up a notch, why not animate them to add a dynamic touch to your website?
To add an animated gradient background to your site using WPBakery:
- Go to the Page Setting by clicking on the gear icon on the top right
- Scroll down to the Custom CSS section
- Add the custom CSS code snippet:
body {
    margin: auto;
    overflow: auto;
    background: linear-gradient(315deg, rgba(250,172,168,1) 3%, rgba(221,214,243,1) 38%, rgba(255,221,225,1) 68%, rgba(238, 205, 163, 1) 98%);
    animation: gradient 15s ease infinite;
    background-size: 400% 400%;
    background-attachment: fixed;
}

@keyframes gradient {
    0% {
        background-position: 0% 0%;
    }
    50% {
        background-position: 100% 100%;
    }
    100% {
        background-position: 0% 0%;
    }
}
Click Save Changes and preview the effect:

Feel free to customize the gradient colors (RGBA values), the angle (degrees), and percentages to match your website’s design aesthetic.
Tip: You can take inspiration for gradient color combinations from CSS Gradient, customize them to your liking, and even copy the CSS code for easy implementation.
Moving Clouds Background Animation
Next up, the site Regeneration has a simple yet cool section with clouds moving across a city landscape as the background.
To achieve this effect in WPBakery Page Builder, all we need is some cloud images and a bit of code magic (don’t worry, it’s easier than it sounds).
To create a moving clouds effect in WPBakery:
- Find or create your transparent cloud images
- Upload the images to your WordPress media library
- Insert a row and divide it into three columns in WPBakery
- Add a Single Image element to each column
- Insert cloud images into each Single Image element
- Assign extra class names (e.g. “cloud1”, “cloud2”, “cloud3”) to each image
- Navigate to the Page Settings and insert the following CSS code into the Custom CSS section:
/* CSS generated by WPBakery AI*/
@keyframes moveCloud {
  0% {
    transform: translateX(-100%);
  }
  100% {
    transform: translateX(100%);
  }
}

.cloud1, .cloud2, .cloud3 {
  width: 150px;
  height: auto;
  animation: moveCloud 40s linear infinite;
}
Save Changes and check out the result:

This code animates the clouds, making them seem like they’re drifting across your screen. To get it, we asked WPBakery AI this prompt: “Create a linear, infinite animation for images with classes .cloud1, .cloud2, .cloud3 and adjust their dimensions to 150px width and auto height”.
Note: You can easily download free SVG images from SVG Repo and adjust them (size, color, transparency) in any vector graphic software (Figma, Sketch, Adobe Illustrator, etc.) available to you.
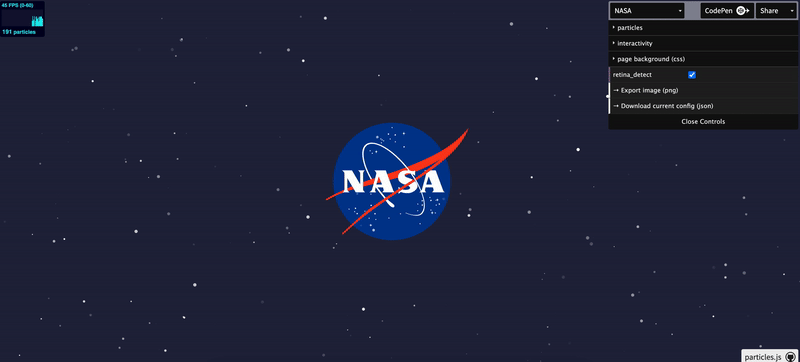
Animated Background Particles
Finally, we saved the best for last – background effects that should dominate web design trends but aren’t used enough.
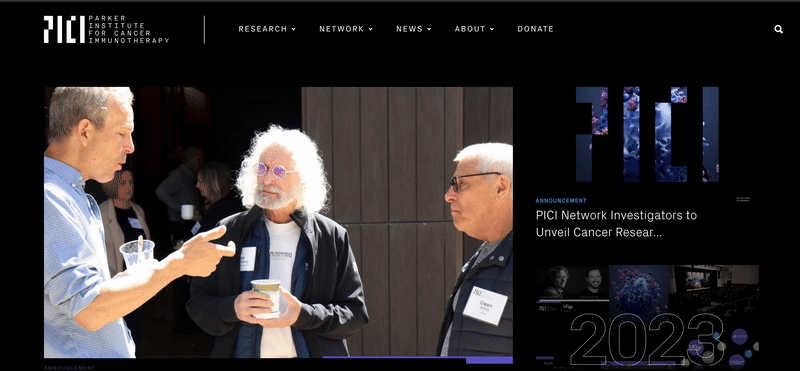
Inspired by the innovative Parker Institute for Cancer Immunotherapy website, a dynamic background effect that would look really cool on it is animated particles:
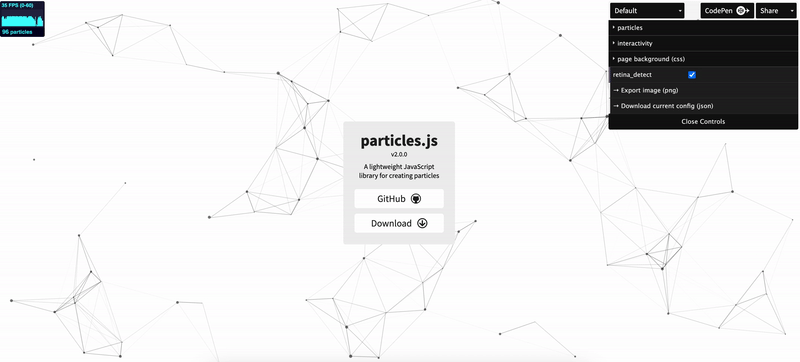
These particle animations can make your web design stand out, and they’re easier to implement than you might think.
To add animated particles to your site using WPBakery:
- Add a Raw HTML element to the page
- Insert the following code snippet into the element:
- Add an Element ID: “particles-js”, to the row you want to assign the effect to
- Navigate to the Page Settings and insert the following CSS code into the Custom CSS section:
- In the Page Settings, navigate to the Custom JavaScript section and insert the following script:
<script src="https://cdn.jsdelivr.net/particles.js/2.0.0/particles.min.js"></script>
.particles-js-canvas-el {
        width: 100%;
        height: 100%;
        position: absolute;
        z-index: -1;
        top: 0;
        left: 0;
        background-color: #ffffff;
    }
particlesJS("particles-js", {
        "particles": {
            "number": {
                "value": 80,
                "density": {
                    "enable": true,
                    "value_area": 800
                }
            },
            "color": {
                "value": "#000000"
            },
            "shape": {
                "type": "circle",
                "stroke": {
                    "width": 0,
                    "color": "#000000"
                },
                "polygon": {
                    "nb_sides": 5
                },
                "image": {
                    "src": "img/github.svg",
                    "width": 100,
                    "height": 100
                }
            },
            "opacity": {
                "value": 0.5,
                "random": false,
                "anim": {
                    "enable": false,
                    "speed": 1,
                    "opacity_min": 0.1,
                    "sync": false
                }
            },
            "size": {
                "value": 3,
                "random": true,
                "anim": {
                    "enable": false,
                    "speed": 40,
                    "size_min": 0.1,
                    "sync": false
                }
            },
            "line_linked": {
                "enable": true,
                "distance": 150,
                "color": "#000000",
                "opacity": 0.4,
                "width": 1
            },
            "move": {
                "enable": true,
                "speed": 6,
                "direction": "none",
                "random": false,
                "straight": false,
                "out_mode": "out",
                "bounce": false,
                "attract": {
                    "enable": false,
                    "rotateX": 600,
                    "rotateY": 1200
                }
            }
        },
        "interactivity": {
            "detect_on": "canvas",
            "events": {
                "onhover": {
                    "enable": true,
                    "mode": "repulse"
                },
                "onclick": {
                    "enable": true,
                    "mode": "push"
                },
                "resize": true
            },
            "modes": {
                "grab": {
                    "distance": 400,
                    "line_linked": {
                        "opacity": 1
                    }
                },
                "bubble": {
                    "distance": 400,
                    "size": 40,
                    "duration": 2,
                    "opacity": 8,
                    "speed": 3
                },
                "repulse": {
                    "distance": 200,
                    "duration": 0.4
                },
                "push": {
                    "particles_nb": 4
                },
                "remove": {
                    "particles_nb": 2
                }
            }
        },
        "retina_detect": true
    });

    var count_particles, stats, update;
    stats = new Stats;
    stats.setMode(0);
    stats.domElement.style.position = 'absolute';
    stats.domElement.style.left = '0px';
    stats.domElement.style.top = '0px';
    document.body.appendChild(stats.domElement);
    count_particles = document.querySelector('.js-count-particles');
    update = function() {
        stats.begin();
        stats.end();
        if (window.pJSDom[0].pJS.particles && window.pJSDom[0].pJS.particles.array) {
            count_particles.innerText = window.pJSDom[0].pJS.particles.array.length;
        }
        requestAnimationFrame(update);
    };
    requestAnimationFrame(update);
Save Changes and check out the result:

Floating Background Particles
Next up, using the same particle generator by Vincent Garreau, we have an effect for all the space lovers out there – floating background particles. This lets tiny dots float around your screen, making your website look like outer space.
To add floating particles to your site using WPBakery:
- Add a Raw HTML element to the page
- Insert the following code snippet into the element:
- Add an Element ID: “particles-js”, to the row you want to assign the effect to
- Navigate to the Page Settings and insert the following CSS code into the Custom CSS section:
- In the Page Settings, navigate to the Custom JavaScript section and insert the following script:
<script src="https://cdn.jsdelivr.net/particles.js/2.0.0/particles.min.js"></script>
.particles-js-canvas-el {
        width: 100%;
        height: 100%;
        position: absolute;
        z-index: -1;
        top: 0;
        left: 0;
        background-color: #000000;
    }
particlesJS("particles-js", {
    "particles": {
        "number": {
            "value": 160,
            "density": {
                "enable": true,
                "value_area": 800
            }
        },
        "color": {
            "value": "#ffffff"
        },
        "shape": {
            "type": "circle",
            "stroke": {
                "width": 0,
                "color": "#000000"
            },
            "polygon": {
                "nb_sides": 5
            },
            "image": {
                "src": "img/github.svg",
                "width": 100,
                "height": 100
            }
        },
        "opacity": {
            "value": 1,
            "random": true,
            "anim": {
                "enable": true,
                "speed": 1,
                "opacity_min": 0,
                "sync": false
            }
        },
        "size": {
            "value": 3,
            "random": true,
            "anim": {
                "enable": false,
                "speed": 4,
                "size_min": 0.3,
                "sync": false
            }
        },
        "line_linked": {
            "enable": false,
            "distance": 150,
            "color": "#ffffff",
            "opacity": 0.4,
            "width": 1
        },
        "move": {
            "enable": true,
            "speed": 1,
            "direction": "none",
            "random": true,
            "straight": false,
            "out_mode": "out",
            "bounce": false,
            "attract": {
                "enable": false,
                "rotateX": 600,
                "rotateY": 600
            }
        }
    },
    "interactivity": {
        "detect_on": "canvas",
        "events": {
            "onhover": {
                "enable": true,
                "mode": "bubble"
            },
            "onclick": {
                "enable": true,
                "mode": "repulse"
            },
            "resize": true
        },
        "modes": {
            "grab": {
                "distance": 400,
                "line_linked": {
                    "opacity": 1
                }
            },
            "bubble": {
                "distance": 250,
                "size": 0,
                "duration": 2,
                "opacity": 0,
                "speed": 3
            },
            "repulse": {
                "distance": 400,
                "duration": 0.4
            },
            "push": {
                "particles_nb": 4
            },
            "remove": {
                "particles_nb": 2
            }
        }
    },
    "retina_detect": true
});

var count_particles, stats, update;
stats = new Stats;
stats.setMode(0);
stats.domElement.style.position = 'absolute';
stats.domElement.style.left = '0px';
stats.domElement.style.top = '0px';
document.body.appendChild(stats.domElement);
count_particles = document.querySelector('.js-count-particles');
update = function() {
    stats.begin();
    stats.end();
    if (window.pJSDom[0].pJS.particles && window.pJSDom[0].pJS.particles.array) {
        count_particles.innerText = window.pJSDom[0].pJS.particles.array.length;
    }
    requestAnimationFrame(update);
};
requestAnimationFrame(update);
Save Changes and preview the effect:
Falling Snow Particles
And last but no least we have a background effect that would be perfect for the holidays –– falling snow particles.
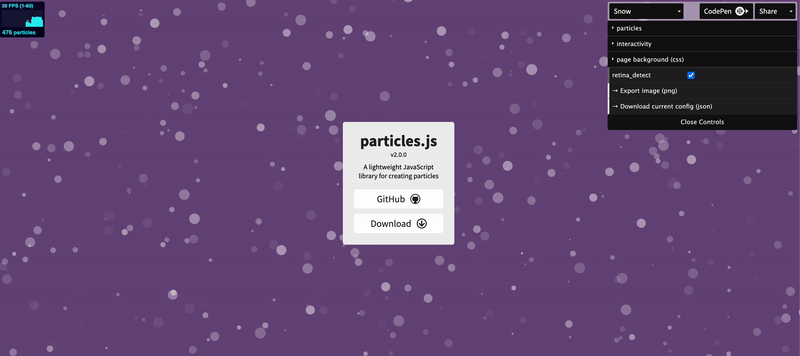
Fun fact: Did you know that e-commerce websites that actually change up their web design for major holidays like Christmas and New Year’s, experience an over 17% increase in sales? This is because a festive atmosphere can put shoppers in a more positive spending mood!
To add a snow particle background effect using WPBakery:
- Add a Raw HTML element to the page
- Insert the following code snippet into the element:
- Add an Element ID: “particles-js”, to the row you want to assign the effect to
- Navigate to the Page Settings and insert the following CSS code into the Custom CSS section:
- In the Page Settings, navigate to the Custom JavaScript section and insert the following script:
<script src="https://cdn.jsdelivr.net/particles.js/2.0.0/particles.min.js"></script>
.particles-js-canvas-el {
        width: 100%;
        height: 100%;
        position: absolute;
        z-index: -1;
        top: 0;
        left: 0;
        background-color: #B8E1E9;
    }
particlesJS("particles-js", {
    "particles": {
        "number": {
            "value": 400,
            "density": {
                "enable": true,
                "value_area": 800
            }
        },
        "color": {
            "value": "#fff"
        },
        "shape": {
            "type": "circle",
            "stroke": {
                "width": 0,
                "color": "#000000"
            },
            "polygon": {
                "nb_sides": 5
            },
            "image": {
                "src": "img/github.svg",
                "width": 100,
                "height": 100
            }
        },
        "opacity": {
            "value": 0.5,
            "random": true,
            "anim": {
                "enable": false,
                "speed": 1,
                "opacity_min": 0.1,
                "sync": false
            }
        },
        "size": {
            "value": 10,
            "random": true,
            "anim": {
                "enable": false,
                "speed": 40,
                "size_min": 0.1,
                "sync": false
            }
        },
        "line_linked": {
            "enable": false,
            "distance": 500,
            "color": "#ffffff",
            "opacity": 0.4,
            "width": 2
        },
        "move": {
            "enable": true,
            "speed": 6,
            "direction": "bottom",
            "random": false,
            "straight": false,
            "out_mode": "out",
            "bounce": false,
            "attract": {
                "enable": false,
                "rotateX": 600,
                "rotateY": 1200
            }
        }
    },
    "interactivity": {
        "detect_on": "canvas",
        "events": {
            "onhover": {
                "enable": true,
                "mode": "bubble"
            },
            "onclick": {
                "enable": true,
                "mode": "repulse"
            },
            "resize": true
        },
        "modes": {
            "grab": {
                "distance": 400,
                "line_linked": {
                    "opacity": 0.5
                }
            },
            "bubble": {
                "distance": 400,
                "size": 4,
                "duration": 0.3,
                "opacity": 1,
                "speed": 3
            },
            "repulse": {
                "distance": 200,
                "duration": 0.4
            },
            "push": {
                "particles_nb": 4
            },
            "remove": {
                "particles_nb": 2
            }
        }
    },
    "retina_detect": true
});

var count_particles, stats, update;
stats = new Stats;
stats.setMode(0);
stats.domElement.style.position = 'absolute';
stats.domElement.style.left = '0px';
stats.domElement.style.top = '0px';
document.body.appendChild(stats.domElement);
count_particles = document.querySelector('.js-count-particles');
update = function() {
    stats.begin();
    stats.end();
    if (window.pJSDom[0].pJS.particles && window.pJSDom[0].pJS.particles.array) {
        count_particles.innerText = window.pJSDom[0].pJS.particles.array.length;
    }
    requestAnimationFrame(update);
};
requestAnimationFrame(update);
Save Changes and check out the result:

Ending Words
Ready to make your WordPress website more exciting? Adding animated background effects can give your website a fresh, dynamic look, making it more interesting for your visitors. So, whether you’re a beginner or an experienced developer, just use the provided code snippets and WPBakery Page Builder to recreate these effects on your site.
So, why wait? Try it out and make your site stand out!
Related articles: